Showing posts with label growing. Show all posts

Thursday, May 5, 2011

Seed Starting: Round #4

On Sunday, May 1, I started my second to last batch of seeds:
  • Serge garden peas
  • Pioneer shelling peas
  • Eureka cucumbers
  • Marketmore cucumbers
  • Burpee pickler cucumbers

I was hesitant to start peas since these are best direct sown into the ground. However, we weren't sure when we were going to be able to get into and work in our community garden plot where I plan to plant these guys. So, because peas are cool weather crops and tend to be done by mid-June when the weather gets too warm for them, I wanted to be on the safe side and start a few, giving them a head start in case we can't get into our garden for a while. The main reason for my caution is that I really want a lot of peas for freezing. They make such a wonderful (and easy) side dish throughout the year and they don't take up much freezer space. Just a winning preservation crop all around!

I am also very excited about the cucumbers. Supposedly these vining vegetables are prolific, but that's never been my experience. In years past, the cucumbers we planted from seed in our community garden plot have always been first ravaged by cucumber beetles in their early stages and then killed by a powdery mildew. So, again in my attempt at preemptive vigilance, we are starting cucumber seedlings and planting those seedlings in our newly constructed raised beds on the side of our house.

I'm glad there's only one more round of seeds to start (squash and zucchini this Saturday) because it means it's almost time to plant! Though spring has somehow passed over us and we've gotten very few gorgeous mid-60s days, I am ready for summer and the harvest it brings.

Tuesday, April 26, 2011

Instructions for Building a Raised Bed

Josh and I have found that, no matter how much you plan, you always have to improvise at least a little bit during any household project especially those that involve multiple tools. So, with that caveat, the following are some basic instructions for building a raised bed garden, Josh and Nicole style.

1. Assemble supplies & tools - For a rectangular or square raised bed, it's easiest to make all wood cuts at once so start with this while you have lots of energy (and patience). Once cut, bring your wood as well as your other necessary supplies over to your project area.

2. Scope it out - Define the area where the raised bed will go and mark accordingly (e.g. with scrap wood, string, line in the dirt). 

3. Prep the area - Remove any grass within the marked space. To do this without losing too much dirt, use a flat edge shovel to cut a straight line in the edge of the grass to be removed. Then, use a pitch fork to gently pull the grass up from the cut edge. Note: To save even more dirt, place lifted sod pieces into a wheel barrow or other container. Let sit for several days, allowing the dirt to dry. Then, when dry, remove as much dirt as possible, placing now dead grass into compost and dirt back into wheelbarrow or container for later use.  

4. Set your square - It is important to start by laying your first board level (i.e. both sides at the same height, not crooked) and square (i.e. parallel to something). To do this, begin constructing the bed by laying a wall that is parallel to something else (for us, the back board of the bed is parallel to the house, see diagram below). Measure the distance from your parallel object to the right side of the board and mark this distance in the dirt. Repeat on the left side of the board. With these distances equal, you can be sure that your first board will be square (and therefore the rest of the bed will be too!). 

5. Trench & post - Dig a small trench (2-3 inches) along the straight line where the board will go. Set the board so it is roughly level, adjusting trench depths as needed. For the most solid construction, plan board edges so that they alternate (see diagram). Dig a 6-8 inch hole where each post will go, taking into account how the next board's edges will meet with the current board.

6. Align next side & attach - Dig a small trench perpendicular to the current board where the next board will go. Hold the edges of the boards together and use the square and level tools to align and level. Have one person hold the board while another attaches the edges with 2 screws through one board and into the other. Once boards are assembled, attach both sides to the dug-in post (2 screws for each side).

7. Repeat! - Repeat steps 5 and 6 on all sides of the bed until complete.

8. Set weed cloth (optional) - Cut weed cloth to fit the bed and attach to ground using landscaping pins.

9. Lay pea gravel (optional) - Scrape just a few inches of top soil off the areas to be covered with pea gravel and place removed soil in the new raised bed. Lay a generous cover of pea gravel on top of prepped areas.

10. Fill & plant - Fill the bed with soil and plant seeds or seedlings as desired!

Of course, no project is this simple. And, I fully acknowledge the inadequacy of these "instructions," but projects are dynamic and often characterized by the be bumps and problem-solving required along the way. Some advice for success:
  • Enlist a friend - two sets of hands (or three) makes the nearly impossible much more simple (especially if your friend has good spatial reasoning or experience with power tools)
  • Take your time - plan at least a weekend and a half since these things always take longer than it seems they should
  • Use props to visualize - when trying to figure out why a corner won't go together quite right or where to dig the next post hole, use extra materials to envision what you're trying to accomplish (e.g. have those friends hold the board edges together while you try the post placement and mark what works)
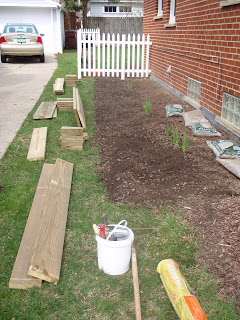
So, to conclude, a before and after sequence for our new, imperfect but lovely raised beds (and check back in June for photos of these beds filled with plants!).

Before
After

Monday, April 25, 2011

Building a Raised Bed

Raised beds are wonderful tools for any gardener, but perhaps especially for a vegetable gardener. Some highlights:
  • Weed control is a piece of cake
  • Soil temperature is all around warmer, meaning earlier planting, later harvests, and perennials that fair better during the winter months than their ground planted counterparts
  • Good drainage so roots don't get water logged
  • High quality soil (especially compared to the clay we usually have)
  • Limited space so any soil amendments (e.g. compost, fertilizer) are more contained and less expensive
For these reasons and many others, this past weekend Josh and I added about 75 square feet of raised bed space to our side yard on the south side of our house. We chose this location because a) there was really nothing noteworthy there to begin with and b) because it's on the south side of the house, the beds will get great light all day long (the sun travels basically over the top of the beds from east to west). Because the space is almost 25 feet long, we chose to do three separate but connected beds with the middle bed taller for a tiered effect. For the small beds, we used eight inch boards and for the tall twelve inch. All of our materials cost slightly less than $200.

Raised Bed Plan

Materials
Lumber
For our beds, we used pressure treated wood. Pressure treating is a chemical process which slows down the rate at which lumber will rot when exposed to the elements. Some people don't like to use pressure treated wood for beds where food will be grown because the chemicals can be hazardous. After our own research, we decided that we were comfortable using pressure treated wood in our vegetable beds, but I note this as a suggestion for those building raised beds to do their own research.

In the end, we used:
  • (5) two inch by eight inch by eight foot boards ("two-by-eights") cut into...
    • (4) 6 foot boards
    • (2) 4 foot boards
  • (3) two inch by twelve inch by eight foot boards ("two-by-twelves") cut into...
    • (2) 7 foot boards
    • (2) 4 foot boards
  • (3) four inch by four inch by four foot posts ("four-by-fours") cut into...
    • (8) 10 inch pieces
    • (4) 12 inch pieces
Note: You can by these materials in almost any length (4 feet, 6 feet, 12 feet, etc.). For our measurements, eight feet made the most sense (also our Ford Focus couldn't really haul much more).

Other  Supplies
  • 3 inch exterior grade screws
  • Pea gravel (13-15 half cubic foot bags)
  • Ready to Raise a Bed
  • Top soil (25-30 forty pound bags)
  • Weed cloth (*optional)
  • Landscaping pins (*if using weed cloth)

Tools
  • Circular saw (or have the store cut the wood)
  • Power drill (plus extension cord if not cordless)
    • Phillips head drill bit
    • Counter sink drill bit (*optional, but definitely handy)
  • Stiff garden rake
  • Trowel
  • Post digger (but a bulb planter also works!)
  • Pitch fork
  • Level (at least 2-feet long) 
  • Large square
And so began our two-day project. Check back tomorrow for construction details...

Monday, April 18, 2011

Seed Starting 2011 - Round #3

On this snowy - yes, snowy! - April day in southeastern Michigan, I bring you a seed starting update.

On Saturday, May 16, I started the following seeds:
  • Late/Storage Hybrid Cabbage
  • Round Dutch Cabbage
  • Italian Oregano
  • Greek Oregano
  • French Rosemary

Before I go any further, I've realized that it may not be apparent why I always leave at least a couple of cells empty. So, to explain: last year I did not achieve an adequate method for keeping track of which plants went where; I mean, I wrote them down, but when they trays were moved for watering, this system quickly fell apart. Therefore, this year I have once again drawn (and posted) an image of each tray, but I also kept a few cells empty so that even if the trays get turned around or reorganized, I'll always be able to figure out how the diagram applies to the tray. Pretty ingenious, aye?

Then, on Sunday, May 17 (after a trip to Downtown Home & Garden for more soil), I started:
  • Cayenne Peppers
  • Jalapeno Peppers
  • Pepperoncini
  • Hungarian Hot Wax
  • Nardello Peppers
  • Islero Peppers
  • Giallo Peppers
  • Blanket Flowers
  • Echinacea (Purple Cone Flower)
Some notes about peppers: All the pepper varieties that I know of need consistently hot and sunny weather to produce in any reasonable quantity. That said, we've generally had the best luck with hot peppers (which is fine because we like spicy!), specifically cayenne and jalapeno varieties. In fact, our 6 cayenne plants and 7 jalapeno plants last year were so prolific that this year we're scaling back to 5 of each. Though they've given us trouble in the past, we're once again trying our hand in growing some sweet and roasting varieties, namely nardello, islero, and giallo.

With only two trays left to start, this seed starting business is well underway. Later this week, I'll post an update, rife with photos of the little tiny seedlings that are popping up everywhere. Until then, stay warm!

Friday, April 15, 2011

It's the Economy, [Friends]!

When Former President Bill Clinton was running his campaign, his strategist famously explained that the best tactic for winning the presidency was through a platform that focused on how he would bolster the economy. He said, and I quote, "It's the economy, stupid."

As most of my generation and those prior know, Clinton ended up winning that election and went on to win another four years later, so clearly there was something to this idea. In fact, the phrase became so prolific it spawned spoofs, books of the same title, and remains today a pop culture reference to the primacy of economics in the every day lives of the middle class. Though from my privileged position I'd like to think that money probably shouldn't be the central motivating factor in anything, it's hard to deny that economic arguments can be pretty darned convincing.

And so, today I share with you information from the Food and Agriculture Organization of the United Nations (FAO) that demonstrates yet another reason why growing your own food just makes sense: not only is it an act of environmental stewardship, of localization, and of true gourmandise, it is also an act of frugality and economic sensibility.

Below is a graph which shows the food price index for the world's food from the FAO. I'm no statistician, but essentially what this graph shows is that the price of food is rising and looks like it will continue to rise in the coming months, years, etc. Even with inflation, it's pretty evident that food is becoming proportionally more expensive, meaning individuals and families have to commit a higher percentage of their income to eating now than they did 15 years ago.


From the Food and Agriculture Organization of the United Nations

In more concrete terms, the last time I was at a grocery store in Ann Arbor during the summer when eggplant was in season, the vegetable cost $1.99 a pound. Granted this may be a high price in some areas, in Ann Arbor it's fairly standard and, even if the price is reduced to $0.99, a pound, you can buy 4 eggplant seedlings at the Farmers' Market for around $3. With a little bit of effort and a patch of dirt to put them in, one plant can produce 5-8 pounds of eggplant meaning with 4 plants, you're getting at least 20 pounds of the fruits. Imagining you find eggplant for $1 a pound at the grocery store, conservatively your return on investment is approximately $15, and this return becomes even larger when you start you own seeds (buying a packet of 50 or so for $3).

That, my friends, is the economic sensibility of growing your own food that's hard to argue with. Of course, small-scale home gardening can't replace all food needs, but with vegetable produce from your own backyard, the less you need to rely on the grocery store. So even if you supplement your shopping list with a just couple of container tomato plants and a pepper plant or two, you're on your way to controlling your food cost in a time when food prices are on the rise.

And, in case you're still not convinced, check out how the numeric index has changed over the past 10 years in the table below. Until next time, shop smart!

From the Food and Agriculture Organization of the United Nations

Friday, April 8, 2011

Seed Starting 2011 - Round #2

Dearest readers, it's been too long! I've been holed up with tracheitis (if you can believe it), but now I'm back in action and eager to share my latest seed starting shenanigans.
Paste, Cherry, Slicing


This past Monday (April 4), I started the following tomato seeds:
  • Roma (paste)
  • Polish Linguisa (heirloom paste)
  • Gilbertie (heirloom paste)
  • Chadwick Cherry (cherry)
  • Bloody Butcher (cherry)
  • Coldset (bigger than a cherry but smaller than a slicer) 
  • Early Girl (slicer)
  • Beefsteak (beefsteak heirloom) 
Some definitions:
  • Paste tomatoes - very meaty, not a lot of seeds or juice; best for processing (canning, drying, freezing, cooking)
  • Cherry tomatoes - small, juicy, flavorful, prolific; perfect for fresh eating and not bad in salsa or stews
  • Slicing tomatoes (or "slicers") - fairly large, symmetrically round fruits that are good for - you guessed it - slicing
  • Beefsteak - very large fruits with good meaty texture; great for flavor but not for slicing due to large protrusions and asymmetrical formation
  • Heirloom - any of the varieties listed above can be "hierloom" which simply means that they are not hybrid varieties

So, because Josh and I do a lot of canning, drying, and freezing, a good majority of our tomato crop is made up of different types of paste tomatoes. Each has its own flavor and though we really like Romas, we're trying a few new ones this year (thanks father-in-law!). 

Tomato purpose practicality aside, there is absolutely nothing better than spending a July afternoon in a garden, half of the time weeding and half of the time eating cherry tomatoes off the vine. Because the fruits are so small, cherry tomato plants tend to have very heavy yields, so we always like to plant a few of them for sharing with neighbors. Also, when we have more than we can handle, we've found they make good salsa. 

And, finally, we plant a few slicers for good measure. We've found that Coldset do well in Michigan because they have a shorter growing season and, unlike other varieties, do not require consistent hot and sunny weather. The Early Girl tomatoes are a similar story, bearing fruits before many other varieties and acting as an insurance policy against crazy Michigan weather. The Beefsteak are tricky and often do not produce very hearty yields for us in part because of their longer growing season. But, the tomatoes we do get can be as big as 2.5 pounds which is a pretty crazy treat that makes it worth putting a few in the ground.

The are 42 individual containers in the type of tray I use. I blame it on the fever, but my math was way off, resulting in the crazy organization you see below:


Check back soon to hear how this weekend's pepper, cabbage, rosemary, and oregano starting go...

Thursday, March 31, 2011

Seed Starting 2011 - Round #1

Last Sunday (March 27), I started the following seeds: 
  • Eggplant - Dusky, Farmer's Long, Charming, and Asian Bride
  • Parsley - Flat-Leaf and Curly
  • Lemon Blam
  • Chives  - Garlic and Traditional
Seed Starting Soil Mix
These fellows constitute round one because eggplant needs 8-10 weeks under lights before it is ready to transplant outside and it requires warm soil to survive outdoors. I plan to move mine into our raised beds around June 4, giving these guys 10 weeks to get growing (note: Raised beds tend to be warmer than ground soil, so June 4 might still be early if putting eggplant directly into the ground). Parsley and lemon balm are similar cases, taking 9 to 10 weeks to start indoors.

The chives are a total experiment. A lot of people say that chives are so easy to grow, you can just sprinkle some seeds outside and watch them pop up. I tried this last year and it didn't work, so this year I'm starting little clumps of them. What I'm slightly concerned about with this approach is that I've heard chives can take over a garden and these will be going in a raised bed with other herbs. So, because they'll get a head start, I'll have to make sure and keep on eye on them...

In addition to what, it's also important to consider how many. Based on the advice of others, I'm using the general rule to start at least one more cell of each plant than I think I need (i.e. I'm planning for 5 Dusky eggplants so I started 6 cells of 2 seeds each). Here's what the final planted tray looked like (with counts):


Mixing Soil with Water
The whole process took about an hour from start to finish and went a little something like this:
  • Take potting soil specifically designed for seed starting and mix it with water until moist but not soaking (I did this in a big aluminum bowl in our kitchen sink, much to Josh's dismay...pictured right).
  • Fill each container section approximately 3/4 of the way to the top with the wet soil mixture. 
  • Place two seeds in each section then cover with soil to just under rim of the container. Each cell gets two seeds as a sort of insurance policy in case one doesn't come up, and if both do, then you get to pick the stronger one.
  • Record where you put which seeds. Many seedlings look alike and even if you can distinguish between plant types (e.g. tomato vs. eggplant), it's very tricky to determine between varieties when they're that young. I draw a diagram (see above). Other people use popsicle sticks in the soil. Whatever works... 
  • When all seeds are planted, cover with the plastic dome and place under the lights (pictured below).
  • Set timer to have light go on around 6am and off around 6pm. 
And voila! The seeds are started. I'll try to keep this up to date with sprout sightings as well as plans for the next tray which is going in this weekend.
    Seed Starting Tray #1

Tuesday, March 29, 2011

Homemade Seed Starting System

Homemade Seed Starting System
In order to start seeds, you need a couple of essential tools, namely trays where the seeds will grow, soil, and lights. There are too many seed starting systems to count available for purchase online. However, because these can get pricey, last year Josh and I invented our own contraption. It consists of:
  • 1 freestanding shelving system
    • 5-shelves
    • 42 inches long x 16 wide x 70 tall
    • If possible, shelves should have holes on both sides for ease of hanging lights
  • 3 hanging florescent shop light fixtures 
    • 2 florescent lights bulbs per fixture
    • 48 inches long - these come in all sizes, but the standard 48 inch long bulbs are by far the least expensive making these fixtures the most economical
  • 6 florescent light bulbs
    • 3 warm spectrum (2,500-3,000 kelvin)
    • 3 cool spectrum (5,000-6,500 kelvin)
    • 1 warm and 1 cool go in each shop light fixture to provide a full spectrum of light for the plants - note: you can also buy "gro-lights" which have the full spectrum in a single bulb, but they're expensive so if you're looking for an economical way to go, try a two bulbed approach
  • Plastic drop cloth
  • Seed Starting Trays (pieces - top; assembled - bottom)
    • Big enough to wrap around the system, trapping the heat from the lights inside
  • Thermometer (to keep on a shelf, making sure it doesn't get too cold)
  • Power strip (each fixture has its own cord)
  • Electrical timer (so you don't have to manually turn lights on and off)
  • Basic 4-part tray system (pictured to right)
    • Tray of divided potting containers
    • Solid black insert/water reservoir
    • Stiff green bottom tray
    • Plastic dome cover
And that's it! ... in theory. Tomorrow I'll share my first attempt this season to simulate nature and grow eggplant and a few miscellaneous herbs in my basement.

Monday, March 28, 2011

The Start of Seed Starting

Last night I had visions of an eloquent blog post about seed starting with handy tricks for my loyal readers. Unfortunately, this is only my second attempt at starting seeds and I have no useful tips because last year I gave our seeds sun stroke about 3 weeks into the process meaning this is, in many ways, my first go of it.

Now that you're so enticed to keep reading you can barely stand it, let me begin by explaining what seed starting is and why you'd want to do it...

Basically, there are two ways to get vegetables plants into a garden: 1) put seeds directly into the ground, called direct sowing and 2) plant seeds in small containers of soil indoors and, when they're strong enough and the weather is warm enough, transplant them outside. This second is called "seed starting" because, as its name suggests, you are germinating and beginning to grow seeds before they go outdoors. (For anyone who's ever had a garden, starting seeds is what nursery's and farmers do to sell you "seedlings" in the early summer months).

For me, there are two main reasons to start seeds: First, you extend your growing season, letting you plants get a head start inside March-May so that from June-September when it's warm enough for them to be in the garden, they can dedicate all of their energy to producing harvestable fruits (instead of germinating and creating leaves). Second, from a lazy standpoint, a garden with seedlings is easier to care for than one with seeds. You know where the plants are and you can mulch around the plants to pre-empt the weed without having to worrying about covering up your unsprouted seeds.  

It's worth noting that some plants - peas, beets, carrots, and beans to name a few - don't need to be started indoors. Part of the reason is that they have a relatively short growing period and therefore, do not greatly advantage from the extra time. Another reason is that some of these have very sensitive roots that don't like to be transplanted or, in the case of carrots and beets, the root is actually what you want to eat and transplanting can lead to strange shapes and stunted root growth.

In case I've explained myself poorly, here's a short (4 minutes) video giving a good overview of seed starting.


In my next post, I'll propose a way of saving a significant amount of money on store bought seed starting systems by assembling your own.

Thursday, March 17, 2011

Tool for Savvy Seed Starting & Sowing

Today I come bearing good news about a great tool. My friends, it's simple, it's ingenious, and it makes easy planning your seed starting and sowing with confidence. Brought to you by the people at Johnny Selected Seeds, it's the totally free and super informative Seed Calculator.

Basically, you just enter your "spring frost-free date," or the average last day that you can estimate frost to occur. Then, according to your frost date, this handy table generates the date ranges when you should start specific vegetables plants indoors from seed and when these seedlings should be planted outside.

For my part, I based my planning on the conservative estimate that southeastern Michigan's frost free date is May 21 (though other sources day it can be as early as April 26). Find your own date using the Farmers' Almanac Average Frost Date table. Obviously, no matter what date you use, once you've planted anything outdoors, it's always wise to keep on eye on weather reports in the early season months. This way, if you know frost is likely during the evening, you can take precautions on behalf of your young plants (there are many methods for doing this, ranging from homemade plastic covers to these professional grade fabrics and contraptions). 

I was once skeptical of the need to seriously consider this frost date. I mean, once it's warm, it's warm right? Consider the following from the Farmers' Almanac:
  • 29-32 degrees Fahrenheit kills tender plants
  • 25-28 degrees kills most vegetation
  • Below 25 degrees kills everything other than evergreens
I've smartened up and learned that with the substantial investment of time, energy, and money that goes into plants before you ever put them in the ground, it's important to a) consider frost date estimates and b) watch the weather once you commit your plants to living outside. Fortunately, to alleviate some of the potential anxiety that comes with having to consider yet another factor in gardening, I return to the seed starting and seedling planting date calculator which makes managing these factors all the more manageable.

Map for Rough Frost Free Date Estimates

Saturday, February 5, 2011

A Garden Tool for Picky Planners

I've always been a visual person as well as a particular person. For the most part, this has worked out okay for me... except when it comes to computer-based garden planning tools. Though I've not done extensive searching, the tools I have played with I didn't like because either a) they didn't allow me to customize in the ways I wanted or b) they allowed customization, but had such a steep learning curve that I defaulted to drawing the darn image by hand.

Well, call it progress, but I've found an application that satisfies even me, the pickiest of the picky when it comes to important things like the planning stage of a vegetable garden. And, the best part is, it's totally free and super informative, offering a lot of useful information about the plants selected for the plan. Another potentially valuable feature is the array of "pre-fab" gardens  which are both convenient for those not looking to design their own and can be sources of inspiration to the rest.


One caveat: the application is really intended for square foot gardening, an effective (and efficient) method used by many with limited space available for planting vegetables. For those with more room (like me), it's still a great tool; you'll just need to adjust the recommended spacing according to your own parameters.

For today, I'll conclude with an image of what I've come up with thus far for my own garden (e.g. lots of "preservables" - tomatoes, cabbage, beans, peas, peppers, corn, and squash). It's a work in progress, but gardens always are.

2011 Project Grow Garden Plan (draft)