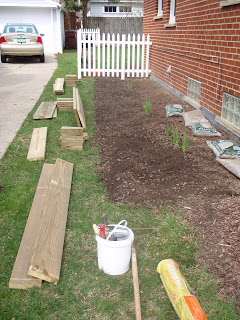
 Josh and I have found that, no matter how much you plan, you always have to improvise at least a little bit during any household project especially those that involve multiple tools. So, with that caveat, the following are some basic instructions for building a raised bed garden, Josh and Nicole style.
1. Assemble supplies & tools - For a rectangular or square raised bed, it's easiest to make all wood cuts at once so start with this while you have lots of energy (and patience). Once cut, bring your wood as well as your other necessary supplies over to your project area.
2. Scope it out - Define the area where the raised bed will go and mark accordingly (e.g. with scrap wood, string, line in the dirt).
3. Prep the area - Remove any grass within the marked space. To do this without losing too much dirt, use a flat edge shovel to cut a straight line in the edge of the grass to be removed. Then, use a pitch fork to gently pull the grass up from the cut edge. Note: To save even more dirt, place lifted sod pieces into a wheel barrow or other container. Let sit for several days, allowing the dirt to dry. Then, when dry, remove as much dirt as possible, placing now dead grass into compost and dirt back into wheelbarrow or container for later use.
4. Set your square - It is important to start by laying your first board level (i.e. both sides at the same height, not crooked) and square (i.e. parallel to something). To do this, begin constructing the bed by laying a wall that is parallel to something else (for us, the back board of the bed is parallel to the house, see diagram below). Measure the distance from your parallel object to the right side of the board and mark this distance in the dirt. Repeat on the left side of the board. With these distances equal, you can be sure that your first board will be square (and therefore the rest of the bed will be too!).
 5. Trench & post - Dig a small trench (2-3 inches) along the straight line where the board will go. Set the board so it is roughly level, adjusting trench depths as needed. For the most solid construction, plan board edges so that they alternate (see diagram). Dig a 6-8 inch hole where each post will go, taking into account how the next board's edges will meet with the current board.
 6. Align next side & attach - Dig a small trench perpendicular to the current board where the next board will go. Hold the edges of the boards together and use the square and level tools to align and level. Have one person hold the board while another attaches the edges with 2 screws through one board and into the other. Once boards are assembled, attach both sides to the dug-in post (2 screws for each side).
7. Repeat! - Repeat steps 5 and 6 on all sides of the bed until complete.
8. Set weed cloth (optional) - Cut weed cloth to fit the bed and attach to ground using landscaping pins.
9. Lay pea gravel (optional) - Scrape just a few inches of top soil off the areas to be covered with pea gravel and place removed soil in the new raised bed. Lay a generous cover of pea gravel on top of prepped areas.
10. Fill & plant - Fill the bed with soil and plant seeds or seedlings as desired!
Of course, no project is this simple. And, I fully acknowledge the inadequacy of these "instructions," but projects are dynamic and often characterized by the be bumps and problem-solving required along the way. Some advice for success:
- Enlist a friend - two sets of hands (or three) makes the nearly impossible much more simple (especially if your friend has good spatial reasoning or experience with power tools)
- Take your time - plan at least a weekend and a half since these things always take longer than it seems they should
- Use props to visualize - when trying to figure out why a corner won't go together quite right or where to dig the next post hole, use extra materials to envision what you're trying to accomplish (e.g. have those friends hold the board edges together while you try the post placement and mark what works)
So, to conclude, a before and after sequence for our new, imperfect but lovely raised beds (and check back in June for photos of these beds filled with plants!).
 | ||
| Before |
 |
| After |


No comments:
Post a Comment